Many things can happen when you try to post an article/file to Usenet through your Usenet provider that affects the integrity of the file. Your broadband connection or even the ISP’s connection to the Internet can be interrupted during posting/uploading and all the RAR files may not make it to Usenet. Or sometimes your newsgroup vendor may have completion issues where older articles are missing RAR parts or have incomplete/corrupt RAR parts. In these cases, creating a PAR2 with QuickPAR will be useful when posting multipart binaries. Today, most multi-part binary posts are posted with a few PAR 2 files just in case a file is corrupt. Par2 files can be used to repair incomplete or corrupt files.
Depending on how you installed QuickPar, you can create PAR2 files two ways. The two methods below will end up at the same settings page:
Method 1: Right-Click to add file
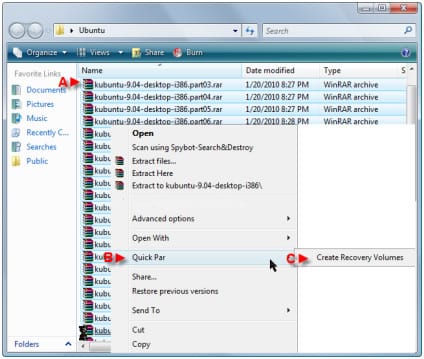
A – Highlight all the RAR files that you would like to create PAR2 files for (selecting only the files that you are posting. Disregard NZB, NFO or SFV files). “Right-Click” the file selection to bring up menu.
B – Hover over “QuickPar” on the right-click menu to bring up “Create Recovery Volumes.”
C – Click “Create Recovery Volumes.” It will bring up the QuickPar interface. (Scroll Past Method 2)
Method 2: Open QuickPar and Add files for Par2 creation.
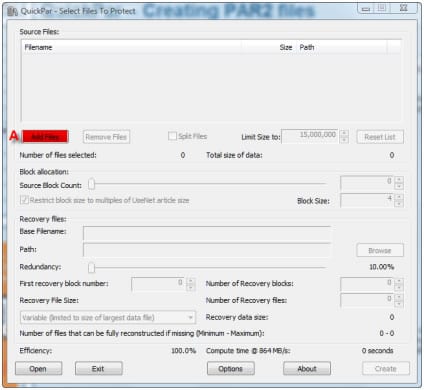
A – After clicking “Add Files,” another window will open. Select the files that you want to create Par2 Files for (select only the files that you are posting. Disregard NZB, NFO or SFV files). After selecting the files it will have returned you to the original QuickPar interface. (See Below)
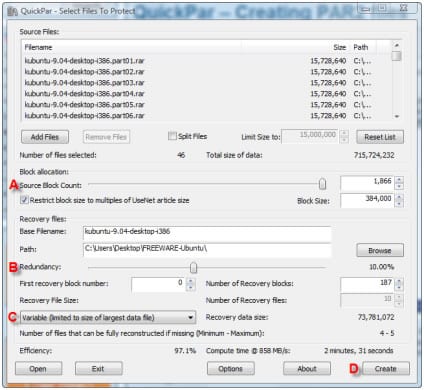
A – Block Allocation – This option on Quickpar allows you to determine how many Blocks the file will be split into. Slide the scale to the very right. Also, select the checkbox “Restrict block size to multiples of UseNet article size.”
B – Redundancy – This option allows you to select the level of redundancy you want on the Par2 files. (100% redundancy allows for complete reconstruction of all the source files). When you first open QuickPar, it is defaulted at 10%. At 10% it shows that 187 Recovery Blocks will be created.
C – Recovery File Size – This drop down menu on the Quickpar interface has 3 options that you can select from. I would just leave it on the default setting of “Variable (limited to size of largest data file).”
1) Variable (powers of 2 sizing scheme) – If you select this option, each successive PAR2 will be 2 times as large (twice as many recovery blocks) as the previous Par2 file. This option makes it easy for a user to select the right amount of recovery blocks needed for RAR repair.
2) Variable (limited to size of largest data file) – This Par2 size option is similar to the previous option. Each successive par2 file will be twice as large as the previous par2 file, however, the largest par2 file will not be larger than the largest RAR file.
3) All the same size – This Par2 size option sets all the par2 parts at the same size.
B – When all your settings are selected, click “Create.”
After you click “create,” QuickPar will bring up a status bar showing you how far along the Par2 creation process.
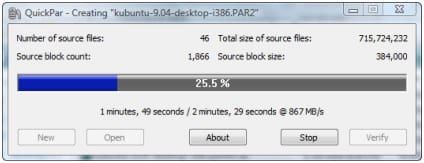
When the Par2 process is complete, it will show the process bar at 100%. You will want to “Verify” the Par2 files that you created. Verifying the files are recommended so that you do not post corrupt Par2 files.
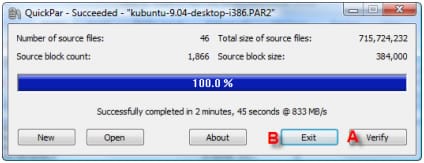
A – Click “Verify.”
B – Click “Exit.” Quickpar should have left the newly created Par2 files in the same folder as your RAR files. Now you are ready to post these files onto Usenet.
For more help refer to other QuickPar guides:
1. How to install QuickPar
2. How to Use QuickPar to Repair RAR’s
3. How to Create PAR2 Files with QuickPar